Analyzing Garment and Knit Fabric
Comparing a Machine Knit and Hand Knit Pattern
Written by Sharon Nani
Previously Published in “Inknitters”
Issue: #118 (Fall 2005)
The purpose for this article is to compare and analyze the concepts involved in developing a machine knit and hand knit pattern. It includes a discussion about the Garment Shape, Yarn Properties, Knitting Techniques, Knit Lace Techniques and Polishing Tips for a Knitting Project
NOTE:Click on all images to see an enlargement of the photo!The journey of joining hand knitting and machine knitting patterns and
technical instruction can be a great adventure and learning experience
The power of observation is not only a great exercise for the brain – it is also a useful tool for taking a pattern written for different media and applying it to your favorite craft. “Inknitters Magazine” is giving authors a perfect opportunity to show you how to take advantage of learning from other methods of constructing fabric. And now, the joining of “Crochet Fantasy” to the family will give all another challenge of joining this crochet media with our articles.
If you travel to another country where the people speak a different language, you will get much more enjoyment out of your trip if you take a little time preparing and learning some of their basic language and words applicable to things you will encounter on your journey. Books are written for just that purpose!
The journey of joining hand knitting and machine knitting patterns and technical instruction can be a great adventure and learning experience too. As a technical writer and designer, it is my goal to give you some hints and alternatives in analyzing and applying different construction techniques that you can accomplish with your craft and still get the same effect and appearance, even if the project is written for a media other than your own. So let’s get packed for our adventure. I’ll bring a garment shape that can hopefully expose you to at least one new skill, some exciting yarn, and a simple classic fabrication that allows us to use our ‘observation and analyzing’ skills. Let the journey begin.
| Terms or Expressions: (ones I used in this article that are not defined in the magazines Terms and Abbreviations) | |
| Media | plural of medium, any material or technique as used for expression or delineation in art |
| Fabrication | construction, in this case how the knit stitches are formed to create the ‘fabric’ which is applied to the garment shape |
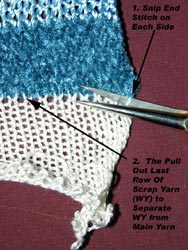
| Scrap on (or) off | an expression used on a production pattern for professional knitting that tells a knitter to begin with waste yarn in a contrast color for assembly purposes. A home machine knitter would be told to knit 1 row of ravel cord between the scrap yarn (waste yarn) and main yarn. The ravel cord would be pulled out during assembly to separate the pieces. In professional knitting, a yarn such as thin cotton, would be used as scrap yarn, the ‘scrap off’ can simply just be unraveled after assembly – the ‘scrap on’ would have the two end ‘scrap on stitches’ next to the main yarn, cut, then this final row of scrap yarn can be pulled out to separate the scrap from the main. ( See Figure One.) A thin cotton (or yarn with equivalent characteristics) would be used because it is strong and will not break when the two pieces are separated. And it is thinner then the main yarn because this makes it easier to pick up the open stitches for the assembly procedures. |
| Resilience | characteristic of a yarn to ‘bounce’ back into shape after being stretched width wise |
The Garment Shape
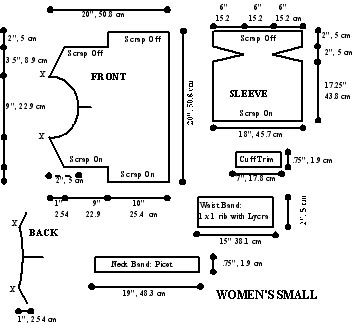
This is a pleasing garment shape for lots of body figures. It is a sideways knit with a square armhole and a higher round neck line. A garment shape is like puzzle pieces that must all fit together when the pieces are assembled. The ‘unusual’ garment piece is the sleeve. Notice, just below the 2” cap piece that fits in the 2” square armhole cut out, there is a 2” dart on each side. This is a method to knit ‘an easy shape’ sleeve that simulates a curved cap sleeve. The extra ease (or height) of the cap is transferred to the underarm level. This sleeve shape allows the upper square part of sleeve cap to fit nicely in the square armhole. The cap ‘darts’ allow the extra height for a better fit sleeve then if it was just squared off. The other advantage will not be evident until you read that my ‘fabric design’ consists of stripes with a lace texture. For technical reasons as explained under Polishing Tips, it is easier to accomplish the short row darts neatly then a curved cap.
Our knitting adventure requires that the finishing assembly techniques are chosen before knitting the garment pieces. The main thing to remember is that whatever technique you choose for the first cast on edge for the side seam – it must be elastic. That is why the pattern says ‘scrap on’ and ‘scrap off” for the side and armhole seams. Here are some shaping options for you to choose from with advantages and possible disadvantages. If different terms are used for machine knitting (MK) and hand knitting (HK) , the machine knitting is first, hand knitting is in parenthesis ( ).
Side Seams
- Scrap on – explained under Terms and Expressions above - First Row of Main Color is at the same stitch size (needle size) as garment. Assemble by hand grafting the side seams. This is the neatest method and most elastic. Only disadvantage is that it is more time consuming and care must be given to graft the stitches so they look identical to the other rows. An inexperienced person at grafting should practice on a swatch, because this could look really sloppy if not done neatly. This method gives a seamless appearance that some people may prefer. See grafting directions at end of article.
- Scrap on – knit first row of MC at the same stitch size as garment. MK: Finish: with right sides tog, rehang open sts on machine and LTBO loosely. HK: with right sides tog, pick up the front side seam sts from WY, pick up the corresponding back side seam sts from WY and BO the sts tog. This method gives a clean seam appearance that some people may prefer.
- Personally, I do not like to sew the seams together, as they are not elastic enough.
- Personally, I do not like to cast on or off by a ‘finished seam’ method, because this is harder to assemble neatly with elasticity. But if you choose to do this – just make sure you ‘mattress stitch’ the seams tog leaving elasticity to the seam
Armhole Cast on
- Same as above and in addition
- If the fabric of the sleeve looks the same when knit upside down, I prefer to: MK: rehang the open sts of the armhole from both the front and back unto the knitting machine and continue to knit the sleeve from cap to wrist. HK: pick up the opens sts of the armhole from both the front and back unto the same needle and continue to knit the sleeve from cap to wrist. (Note, this also makes it easy to shorten or lengthen sleeve if necessary.)
- If the sleeve must be knit as a separate piece, follow the side seam methods.
All Bands with selvedge edges (waist line and neck line)
- This would be specific according to the type of band or trim. The bands can be knit separately, then joined to the body; or a foundation row knit to the body selvedge edge, then the band ‘built on’ to the body piece. Since my garment shape shows a 1 x 1 (knit one, purl one) band, Japanese MK would knit the band, transfer all sts to the main bed, with right sides tog, rehang the selvedge waist line edge on the same nds. Knit the ‘seaming – joining row” on a big stitch size. LTBO. Passap MK would rehang the waist line selvedge edge on the front bed needles with the knit side facing you. Knit 1 foundation row (seaming – joining row) in stockinet, then transfer the sts into 1 x 1 rib. Continue knitting for required rows. Knit final row on T8/8 and scrap off on WY. Then LTBO in ribbing to maintain the correct elasticity. HK would knit a foundation row by with knit side facing you, pick up and knit the required number of sts from the waist line selvedge edge. Then continue in k1, p1 ribbing for required distance. BO loosely.
- If you choose to knit a stockinet pattern trim, such as a picot band, the bands would be ‘built on’ by the methods described above.
- Some people choose to always knit their bands separately and join by their preferred hand method such as back stitch or linking together on a ‘Linker”. ( Note: I will write an article on “Linkers” in a future issue for those of you that are not familiar with this assembly tool.)
Sleeve Band with sleeve cuff edge being open stitches
- Same as other bands except you are either (MK) rehanging open stitches first (HK: picking up open stitches). In this case, since the sleeve is ‘square shaped’, the band trim would be on less stitches, so the appropriate number of stitches would be knit tog according to the decrease ratio given in the pattern when the foundation row is formed.
The Yarn
Text for this Category Chenille 2000 by Silk City (2000 yds/lb- 100% viscose) and 6/3 Rayon by SunRay (1600 yds/lb – 100% rayon) make a wonderful combination for this garment. An equivalent yarn for the 6/3 Rayon is Silk Cities Slinky (1600 yds/lb – 100% viscose). It has the same shiny, smooth texture and yardage. I love the soft feel of the chenille and the crisp shine of the smooth twist rayon or viscose. These two yarns combined in a tone on tone color way result in a classic garment. It is always useful to understand some characteristics of the yarn fibers when you choose the yarns to use in your project. This is also necessary so you will know if there are any ‘first aid guide” tricks you should apply when knitting with them. See my previous article in Machine Knitters Source Issue 118: Professional Polishing, for details.
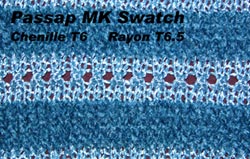
Since I chose a stripe pattern with two different yarns, the first thing to remember is that you must ‘compromise’ the stitch size of each yarn to obtain the same stitch gauge – stitches per inch or centimeter for both the chenille and rayon. In this case, since the yarns are close enough in yardage/lb, stitch size 6 on a standard gauge brother knitting machine gave 6.8 stitches per inch for both yarns. But I have knit with yarns that I had to use a different stitch size (needle) for each yarn. (see Passap swatch information: Figure 3) For example on a standard gauge Brothers machine, rayon boucle knit with ribbon stripes, I use stitch size 6 and 8, respectively. (HK use size 3 needle: see hand knit swatch : Figure 4). The row gauge/inch/cm will be different for the chenille (9.7 rows/”) and rayon (15.6 rows/”). To compensate for this I determine the row gauge of the pattern multiple – the 2 stripes together which was 12 rows/inch.
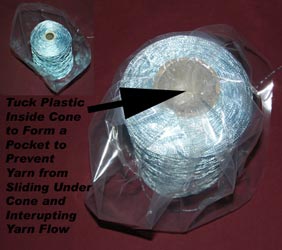
Use the Plastic Bag Trick to prevent slippery yarn from sliding under the cone or tube and hanging up, prevent the yarn from flowing properly
Yarn properties affect the appearance, drape, comfort, and durability of the fabric. This is a topic for a separate article. But here are some facts that you should be aware of now for this garment/project:
- Chenille that is knit at too loose of a stitch gauge may tend to ‘slip’ or worm out through wear. This is why chenille, especially when knit by itself, is knit at a tighter gauge. Chenille 2000 usually yields approx. 7.5 sts/” in a fair isle pattern. The 6.8 sts/” was a close ‘compromise’. This garment shape in itself requires a fabric or yarn with more drape, so the slightly looser gauge for the chenille works good for this pattern and is not too loose to worm out.
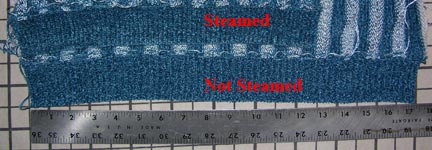
- Chenille viscose does not have good resilience. Therefore, when used for a ribbing, it requires the use of a ‘stabilizer’ such as lycra® a spandex stabilizer. A sewing thread could be used as a substitute, but this would not have as much resilience. (See Figure 5: chenille rib with lycra before and after steam).
- Slinky or 6/3 Rayon is a shiny, smooth, and ‘slippery’ yarn. It comes on a cone and it has the tendency to slide down and under the cone. This would obstruct the yarn flow. To eliminate this problem – use the ‘plastic bag’ remedy. Place the cone of Rayon in a plastic bag. Tuck the bottom of the plastic bag up inside the underside of the cone. This creates a ‘pocket’ under the cone and prevents the yarn from sliding under the cone. I use this remedy for all ‘slippery’ yarn: yarn with rayon in it, ribbon, metallic, and novelty yarns. (See Figure 6). (Note I also leave the tube of lycra in the plastic bag as described here.)
- MK: use a wax device for rayon yarns. See MKS Issue 105: “Match Sticks & Paper Clips”.
- Rayon and Lycra® both require steaming in the finishing process to acquire their finished properties. (Just pass steam over the yarn – do not press).
The Fabrication: Converting between Machine and Hand Knitting
Now, I am to the subject where the real analyzing takes place. I selected a simple lace texture because the procedure to duplicate the stitch structure in hand knitting, knitting on Japanese knitting machines and knitting on Passap knitting machines results in different choices. Some of these procedures will give a close look to the appearance of the fabric and be easy to knit, while others duplicate more precisely with more steps in the construction. This is often time the case in converting fabric for different media. In the knitting machine world, each brand of machine whether manual, punch card, or electronic, has the ability to create most stitch structures. What makes them different is the time and ease involved in constructing the fabric. There are several different ways of creating lace fabric. In this article, I will only be using the method used to duplicate the lace made in my garment “Chenille, Rayon, and Lace” also in this issue of “Inknitters.” This lace was the standard lace made with a lace carriage on a Standard Gauge Brothers Knitting Machine.
This procedure is equivalent to hand knitting lace: SSK (slip knitwise, slip knitwise, K the 2 sts tog is the same as ‘moving the sts to the adjacent needle on the knitting machine to the right. Yarn over is the same as the ‘empty needle catches a loop of yarn. So you can see converting between a pattern written for a Japanese/Chinese manufactured machine (Brother, Silver Reed, Studio, Knitking, Artisan) would be relatively easy). To duplicate the stitch a hand knitter would: Yo, SSK.
If the stitch on the Brother knitting machine had been moved to the right with the empty needle would be to the left of the needle with the two stitches. Hand knitters would K2 tog, Yo.
Any single or double bed knitting machine can duplicate this procedure manually as explained above.
The procedure involves some extra steps to duplicate automatically on a Passap knitting machine because of the way Passap makes lace automatically. The transfer carriage (which is used to create lace fabric) [U70, U80, U100, or U100E] transfers stitches to the ‘opposite bed’. Therefore, to accomplish the duplication of this ‘lateral lace’, these steps are involved:
- First, the appropriate stitch where you wish the lace hole to be formed must be transferred to the back bed. In my example this is every other stitch. Number 2 on the U80-U100-U100E transfers every other stitch to the back bed - starting with the 2nd stitch. (Note: if, you wish to transfer every 3rd stitch – then you would use #5 with a pusher in work to represent that stitch - #5 will transfer the stitches where a pusher is in work position). For simplicity: Leave the racking handle at transfer position - 9 o’clock- for the entire pattern. The locks are set to GX/N. Black Strippers. Appropriate needle on back bed is in working position to receive the transferring stitch.
- Second, prepare the back bed stitch to be moved back to the ‘front bed adjacent needle” by turning the racking handle 1 full turn to the left, - in this case – 9 o’clock to 9 o’clock - this moves the back bed and the needles over one full needle position.
- Third, you would think now that you could simply transfer the back bed stitch , back to the front bed and it would be in the appropriate place. This is true if you used a big enough stitch size for knitting the yarn. The transfer carriage would jam on this row if the stitch size is too tight. Therefore, you must practice this on your swatch to determine the correct stitch size (the tightest you can use without the transfer carriage jamming. I found with Rayon stripe I used Stitch Size 6.5, then, changed to Stitch Size 6 for the Chenille.
- Fourth, transfer the back bed stitches to the front bed. Remember to turn the racking handle 1 full turn to the right – 9 o’clock to 9 o’clock which is the original position.
- Repeat this procedure for each lace row.
Polishing Tips
- The garment pattern is designed so that the center of a stripe is in the center of the neck line, this allows the stripes to begin and end at symmetrical rows dependant upon the yarn you wish to assemble the side seam with. Personally, I find that it is easier to graft a seam with the chenille.
- This in turn, allows you to knit the two body pieces as identical pieces instead of one in mirror image.
- This in turn, allows you to make the stripe color changes at the waist line edge to accomplish a neat neck line edge with no loops of yarn between yarn (stripe) changes. Therefore, the pattern diagram shows that you start the garment shape with the waist line to the right side – where stripe changes would begin on a knitting machine. Stripes are in an even row multiple.
- If you rehang (pick up) the armhole sts to knit the sleeve upside down, ensure that the stripes start at a point to match the armhole cut out on the body and therefore still stay in the pattern multiple.
- If you knit the sleeves starting at the cuff, verify that you begin at the correct row of the multiple of the pattern to ensure that the cap will line up with body stripes.
- At the sleeve cap, try to keep short rows in the ‘solid parts of stripes’. Where this is not possible, Japanese MK must manually transfer these stitches, as lace carriages will not go over needles in holding position. Passap knitters – could use transfer carriage #5 with pushers and put the pusher for the nds that are short rowed in rest position. Hand Knitters would be putting the sts that are short rowed on a separate double pointed needle.
- When I write a pattern, I take these things into consideration, if you alter the pattern – remember to keep these points in mind. The garment “Chenille, Rayon, and Lace is engineered for each size to meet these requirements. Therefore, pay close attention that the body and sleeves start with a specific number of rows of a stripe – which is not part of the pattern multiple for each different size.
The Graft Stitch!
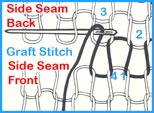
Diagram for the Knitting Technique of Grafting open stitches of the knit sweater side seams together
Steps for :Graft Stitch (see diagram)
- Steam Open Stitchs to Set Stitches
- Remove Scrap Yarn as you graft
- Reform the missing knit row by:
- With right sides facing you and same yarn, insert the needle coming ‘up’ the hole of the first side stitch on the front (1).
- Go across the side seam opening and insert the needle going ‘down the hole of the first stitch on the back (2) then ‘up’ the hole of the adjacent open stitch on the back (3) in the same movement of the needle.
- Go across the side seam opening and insert the needle going ‘down the same hole of the first stitch on front (4)
- This completes the sequence to form a knit graft stitch. Repeat Steps 4-6 for all open stitches.
Summary: Comparing a Machine Knit and Hand Knit Pattern
In summary, you can learn a lot about converting hand knit to machine knit and visa versa, by reading the corresponding patterns in this issue. Look for the matching terms and ways of doing the procedures. Then you can take this information and also apply it to your favorite patterns in your library.
Note by author: Since Lycra® is such a “Bread and Butter” basics stabilizer, I offer it for sale on my web site: www.theknittree.com It can be found in the Bread and Butter Basics Showroom where the link will take you to the product page in the store catalog, also in the Bread and Butter Basics category under ‘Patterns and Kits”.
Visit us on facebook too ~ page is in development
