Tips for Sewing on Knitted Yarn Fabric
Including Sewing Instructions for a Knit Pink Camouflage Baby Beanie
The Knit Tree knows that other crafts people and sewers enjoy making their own knit clothes for themselves or gifts. We also know that sewing fabric with knitted yarn is hard to find. Our camouflage Winona knit beanies, knit skull caps, camo baby clothes, camouflage sweaters, and camo pants have been so popular and we have had several requests to sell our fabric and / or knit patterns. So, this is the first of our yarn fabrics that we offer in yardage or knit beanie kits for the craftsmen that want ‘to sew it themselves’. The camouflage cap beanie knit yardage kits can be found in The Knit Tree's online catalog in a merino wool / acrylic blend for children and adults camouflage beanie caps and in acrylic knit yardage for baby caps.
Sewing on double jacquard knit fabric made by hand looming the yarn is easy to do, but to give you the confidence to give it a try, here are some sewing tips using the sewing instructions for a pink camouflage baby beanie as our example.
Sewing on Knits
Steps of Sewing a Knit Camouflage Baby Beanie
What is Double Knit Jacquard Fabric Hand Loomed with Yarn?
Susanna E. Lewis defined it best in her book “A Machine Knitter’s Guide to Creating Fabrics” : “Rib jacquards, also known as double jacquard, fairisle, double fairisle and multicolored rib, are made double bed. A backing is knitted on the second bed simultaneously with the design on the main bed. Floats on the reverse of jersey jacquards are knitted into the backing, producing a thicker, more stable, often reversible fabric.”
Our knit jacquard camouflage fabric is knitted on the Passap E8000 knitting machine. It has a very fine needle spacing giving this 3 color jacquard fabrication a stitch gauge of 10.3 stitches per inch and a row gauge of 28 rows per inch (or 14 visual knit rows in one inch). The fiber content can be composed of what ever yarns are combined in the knitting process. We have blended cotton, merino wool, rayon, and acrylic yarns in a variety of ways and percentages. The camouflage yarn in this baby beanie is 100% high grade turbo acrylic which gives a nice softness and easy wash and wear care necessary for babies. But for adults and children we also offer a blend of merino wool and acrylic fabric.
What are Color-ways?
We all know ‘there are different strokes for different folks’. People like different colors so designers offer the same garment in different colors… but camouflage clothes have another reason for different color-ways. Camouflage fabric is meant to ‘hid’ the wearer in different environments. In nature, we have different seasons which change the look of the environment. Spring when green foliage is coming into play, fall when colors change, green leaves are dropped and more brown colors are evident. Winter is when the snow covers the trees with glimmering white colors. Read more about it in our article: Camouflage Clothing for Hunting and Knit Yarn Properties”. See the different color ways all hand loomed with The Knit Tree's three color Winona jacquard pattern:
- D: camel/brown/mocha ~ sunny fall woodland camo
- E: camel/black/brown ~ fall woodland camo
- G: grey/black/white ~ snow camo
- H: camel/brown/olive ~ spring camo
- I: camel/ivory/light olive ~ light spring camo
- J: pink/ivory/light olive ~ pink camouflage
- K: olive/camel/light olive ~ spring woodland camo
- J: pink/ivory/ light olive
- N: pink/black/grey
- Q: deep mocha/black/brown
- S: grey/black/brown
Click Here to see an article showing examples of the different color ways offered by The Knit Tree. These colors may appear differently on different computer monitors. As different dye-lots of these colors are used, you may see a slight variation in yarn colors.
Prepare the Double Knit Jacquard Yardage for Sewing
Knit yardage should be ‘first steamed’ to set the knit stitches when knit fabric is used in cut and sew projects. The knit stitches would have a tendency to ‘unravel’. This is particularly true of ‘single knit fabric’. As a safety precaution, all knit fabric should be ‘first steamed’ before cutting out the pattern pieces. This does not mean ‘pressed’ with an iron. Putting the weight of an iron on some yarns will kill or melt the fabric. See my article “The Three Stages of Steam’ for a fuller explanation of this topic. (note: this will be posted soon). All yardage from The Knit Tree has been ‘first steamed’ and a serged edging is applied at the ends to prevent unraveling. Wool and Cotton fabric is also steamed to eliminate the shrinkage factor in these fibers. The Knit Tree does the first steam preparation step on all their knit yarn fabric yardage for you in preparing the yardage for the cut and sew projects.
Select Your Sewing Pattern to Determine the Required Length of Fabric
There are several sources of sewing patterns. You can purchase the pattern of your choice at a sewing or fabric store where choices such as Simplicity, McCalls, Vogue, and Butterick all give you a wide variety. I used simplicity patterns 5316 and 9782 for baby clothes and beanies and The Green Peppers “Polar Beanies” pattern F857 (534 on their web site) for Adult and Children Beanies and skull caps. The beanies can be found in the packs and misc section. This pattern is included in The Knit Trees Camouflage Merino Wool / Acrylic Adult and Child Beanie Kit. I use Cochenille’s Garment Designer Software to draft my own sweater, pants, and other knit garment patterns. This software has a nice feature of letting you set the ‘width’ of your fabric, and laying out the garment pieces on the fabric to determine the required length of fabric. It also prints out your sewing pattern with the seam allowance that you choose.
Most cloth fabrics come in a width of 45” or 60”. Since Knit Yarn Fabrics vary in width dependant upon the yarn content, always check the width of the fabric given in the product description: 36-37 inches in this case, so I’d use 36” for calculating.
Select your pattern. Most patterns have multiple sizes included, so you must trace off your desired size first. Cut out the paper pattern and lay out the pieces for a 36" wide fabric to determine the required amount of yardage that you will need. The finished circumference of New Born hats measure 15.5” – 16”, and 6 Months measures 17”. So you can make 2 baby hats in one width of 36” fabric. The length of fabric required depends on the style cap you desire. I will use a ‘classic beanie or skull cap which has a facing hem to match the adult classic caps. This requires 10” of fabric plus I always allow for 2 inches ease or 12 inches of fabric minimum (1/3 yard for baby beanies).
Sewing Tip 1. For other sewing projects click here for a nice fabric conversion chart that covers widths from 32”- 108”.
Sewing Tip 2. Most baby hat sewing patterns start at 17” (6 Months this is size S in the Simplicity baby sewing pattern)), to make a New Born hat, simply trim off the ‘seam allowance, which reduces the circumference and make it 1 inch shorter. Circumference of New Born Caps range from 15.5" to 16".
Sewing Tip 3. I tape the ‘master paper pattern’ to my patio window so the sunlight comes through to make it easy to trace off my desired size on other paper. Light Boxes are also used for tracing patterns.
Cut out Your Fabric Pattern Pieces
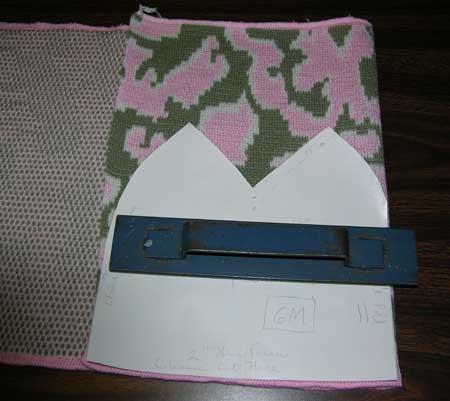
Paper pattern on camouflage fabric.
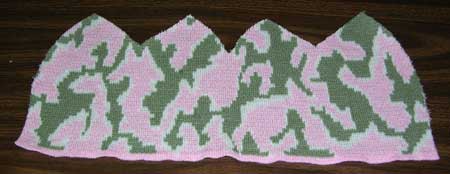
Cut out baby beanie.
In the case of our 6 Month Baby Beanie, the hat paper pattern is placed on the fold. Since I want to make 2 baby hats and I don’t want to waste any fabric, fold over the fabric at one of the edges, just the width you need for the paper pattern for the baby hat. Place the paper pattern on the fold line of fabric. I just place weights on my patterns to hold them in place while I cut them out, but you may prefer to pin them into place.
Double jacquard knit fabric is very stable and the pre-steaming sets the stitches, meaning that when you cut it out it will not unravel, the 3/8 -1/2 inch seam allowance will ensure that you have enough extra material to serge (or zig zag) and sew your project.
Two Methods to Sew the Baby Beanie or Hat Together
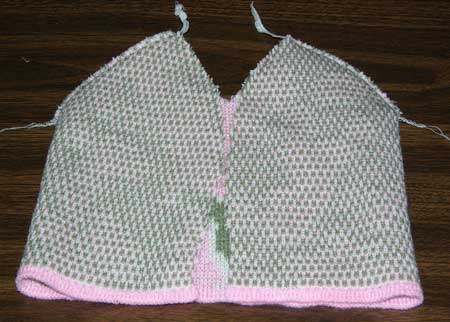
Serge the side darts together.
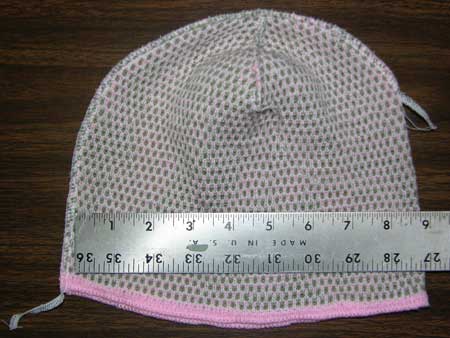
Serge the back and top seam of the knit camo baby beanie
1. SERGER: Directly seam the project together with a serger. A. With right sides together, Fold the two side edges inward to match the open top dart seams and serge the dart seam from the top down tapering out to the edge of the seam allowance at the end of the dart. Repeat for 2nd side dart.: See photo to the right showing the serged edges
;B. Serge the bottom edge of the beanie to lock the cut edge stitches if you did not use the part of the yardage that has a finished cast on
C. With right sides together, Fold the Center Back seams together, make sure the two finished darts meet together at the top of the baby hat. Serge the seam starting at the bottom, going over the top (ensuring darts come together at center top) and finish at the end of front dart. Again make sure to taper out to the edge of the seam allowance at the end of the dart
Also, notice the ruler in the picture. It is at this point I check to make sure my 6 month baby hat measures 17" and my new born baby hat measures 15.5-16". Anchor down and hide serge thread ends.
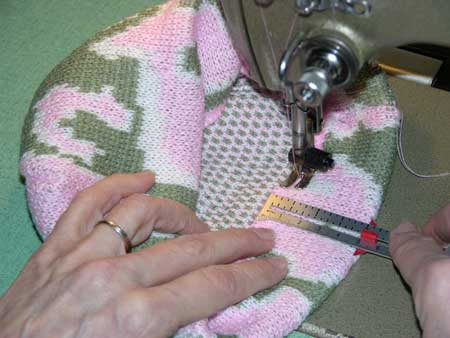
Sew the bottom hem of the knit camo baby beanie.
D. Turn up bottom Hem Facing. Pin into place. Top Stitch the hem seam down with a straight stitch sewing machine. Tip: I sew from the inside to make sure I catch the facing seam allowance neatly just inside the serged edging
2. Sewing Machine: A. If you have an overlock stitch on your sewing machine, use it and follow the steps under serger. B. If you do not have an overlock stitch, first use a large zigzag stitch to sew on all edges to catch the cut edges. Then sew the seams together with a large basting stitch size to give elasticity to the knit fabric (this would be a length of 4 on my sewing machine.) following the same steps as under serger. The sewing patterns give give instructions and pictures for sewing with a regular sewing machine.
Finishing and Polishing the Baby Beanie
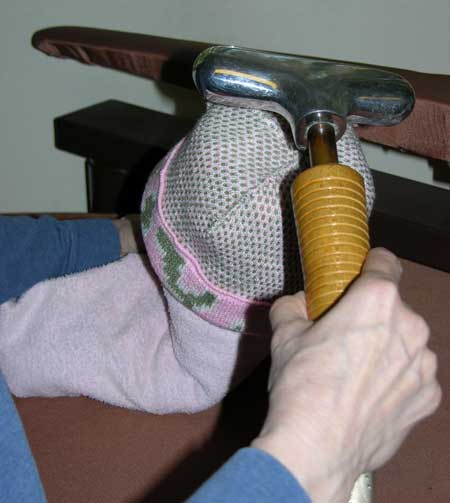
steaming the dart seams of the knit baby beanie.
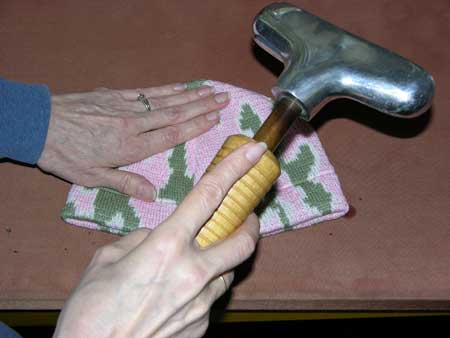
hand press the knit beanie
Tips for nice polishing in finishing: 1. steam open the seam allowances from the inside - do not hard press with an iron: JUST PASS STEAM OVER AND 'HAND PRESS' or lightly touch with iron. If you do not have a ‘sewing ham’, roll up a towel to lay the darts on, steam the darts with a garment steamer or a steam iron that puts out good steam.Then press the seam flat with your hand while the dart is still warm.
2. Turn the hat to the right side. Pass steam over it. Hand Press into a nice shape, rounding the top, first apply steam (do not have hand in way of steam) - then quickly press with hand while the knit is warm and moist- repeat procedure as needed.
3. Sew a pom pon on the top if desired.
Go to our online catalog to view different finished knit camouflage hats: boarder / hunter beanies (roll up facing hem for more warmth), classic beanies or skull caps, beanies with a 1.5 “ visor, and even an camo flap cap with a Peruvian Hat flair in adult size or a pink camo flap cap for children.
Double Jacquard Knit Yarn Fabric and Fabric Kits
The Knit Tree has added a Sewing Knit Fabric Yardage and Kits Category to our Online catalog. The Camouflage Baby Hat / Beanies yardage kit includes 1/3 yards of knit fabric at the 36” width plus two pom pons. There are several color ways to choose from. The beanie yardage kits for children and adults come in the 25” yardage width to be more economical. The sizes XS would require 20” wide, whereas the XL beanie requires 25” wide, so this yardage would be appropriate for any child or adult beanie. Patterns are included in the child adult kits but at this time the Green Pepper did not have the baby beanie pattern. Baby beanie patterns are included and easily found in several simplicity, vogue, butterrick, or other sewing pattern suppliers patterns.
So the Choice is yours: if you are a sewer, and enjoy sewing knit fabric you can save money and buy the knit camouflage fabric or yarn fabric kit. If you prefer you can purchase the knit camo beanies and skull caps already to wear! Then take a look at our camouflage sweaters , camouflage jackets, camouflage baby clothes and camo pants for more ideas. Either way – The Knit Tree enjoys Meeting Your Needs.
Visit us on facebook too ~ page is in development


