How to Hand Knit the Knit Stitch
For Plain Knitting or Garter Knitting
Hand Knitting Instructions by Sharon Nani / The Knit Tree
Photos by David Nani
Hand Knitting begins by making a Slip Knot and Casting On the required number of stitches for your project. Then you follow the instructions for knitting the body of the project which in this case is knitting the knit stitch for a Garter Stitch Scarf. The final part is Binding Off the hand knitted project and doing the finishing techniques required. This part teaches you how to form the knit stitch, a critical part of knitting a project.
NOTE:Click on all images to see an enlargement of the photo!Photo Steps Instructions of how to form the Knit Stitch
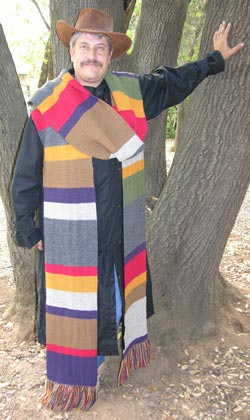
Fun and colorful Doctor Who Season 12 Striped Garter Stitch Scarf
Our First Hand Knitting Project for our Little Knitters Program is the Fun and colorful Doctor Who Season 12 Striped Garter Stitch Scarf. We also offer Pure Wool Yarn Kits for this scarf which can be knit as the original Dr Who Scarf which is 15 feet long, or you can knit 2 scarves 7.5 feet long, or knit three great gifts of gentlemen scarves each 5 feet long, from this yarn kit.
Read about the entire learning process of the Little Knitters, taking them through researching to find and buy the correct yarn and colors for this Fan Based Knitting Project, drafting the knit pattern, learning the knitting techniques, then knitting this scarf for their Knitting for Charity Challenge. Click here to read Doctor Who Season 12 Scarf Knit for Charity Challenge You may even find a finished Doctor Who Scarf available for purchase with proceeds donated to The Leukemia & Lymphoma Society and The Little Knitters Program.
We share these knitting instructions with you so you can also learn to knit with a fun and colorful knit project. Enjoy knitting with your own yarns or you can purchase the pure wool yarn kit with Spreadsheet Knitting Chart from our online Catalog for the Season 12 Dr Who Scarf. Print out the series of instructional articles from our web site to aid in your learning to knit process
How to Knit the Knit Stitch ~ A Basic Knit Structure for Hand Knitting
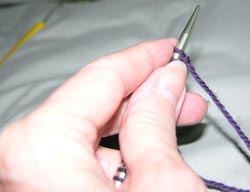 Figure 1
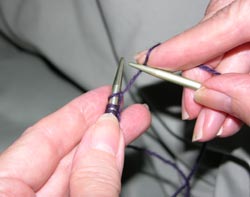
Figure 2
Left: Figure 1
Hold the needle with the stitches just cast on with the left hand
The first stitch is held lightly by the index finger near the tip of the needle. This helps you control the stitches during the hand knitting process.
Right: Figure 2
Hold the knitting needle in the right hand with the thumb and index finger as if you are holding a pencil. The yarn is woven over the first finger, under the second, over the third and under the fourth baby finger just like you learned in Part Two of this Series of Basic Hand Knitting Techniques. Cast on steps figures 2 and 3.
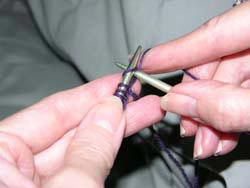
Figure 3
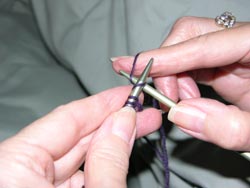
Figure 4
Left: Figure 3
Bringing your hands close together, insert the right hand knitting needle into the front of the first stitch on the left knitting needle from the left side.
Steady the right knitting needle against the forefinger of the left hand, keeping the yarn to the back of your work.
Right: Figure 4
With your right hand, bring the yarn over the point of the right knitting needle. Notice that it goes under the needle, then your right hand index finger holds tension on the yarn pulling it upward.
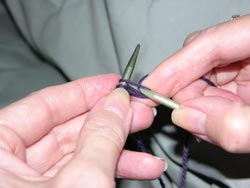
Figure 5
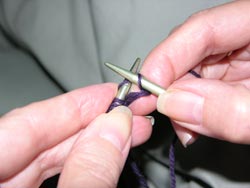
Figure 6
Left: Figure 5
Draw the yarn on the right hand needle through the stitch on the left hand knitting needle.
Right: Figure 6
Slip the old stitch off the left needle by pulling the right hand needle to the right.
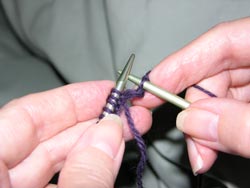
Figure 7
Left: Figure 7
This completes the first stitch and a new row of knitting is being formed on the right hand needle.
Keep pushing your stitches up on the left hand needle to keep them close to the tip of the needle as you repeat steps in Figures 3-7 until all the stitches have been knitted off the left hand needle.
Tip: some beginning Knitters like to tuck the right hand knitting needle under their arm to steady it.
Forming the Knit Stitch is easy to remember by repeating these 4 steps to yourself:
Step 1: “In” Figure 3
Step 2: “Over” Figure 4
Step 3: “Through” Figure 5 and 6
Step 4: “Off” Figure 7
You have now completed ONE ROW of knitting. In our example of the Doctor Who Scarf, you should have 60 stitches on your right hand needle for a 10 inch wide scarf when you got 6 stitches per inch.
To knit the SECOND ROW and proceeding rows
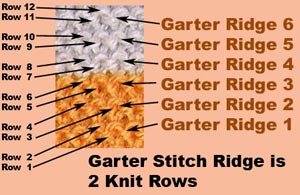
Figure 8
Left: Figure 8
A Garter Stitch is formed by knitting each row with just KNIT STITCHES. One Garter Ridge consists of 2 knitted rows.
Transfer the needle with the stitches into the left hand. The empty needle is in the right hand. Repeat steps figures 1-7 above to knit Row 2. Now one Garter Ridge or 2 knit rows are complete.
Continue Knitting each row until the first stripe is complete.
A Colored Chart for the number of garter rows in each color of stripe for the Season 12 Doctor Who Scarf is available at the doctor who web site:
The Doctor Who Season 12 Scarf Yarn Kit available in The Knit Tree’s online catalog contains a spreadsheet giving the garter rows, knitted rows, and measurement of each stripe in inches and centimeters for hand or machine knitters in case your stitch and row gauge differs from the original chart.
To Change Colors for each Stripe
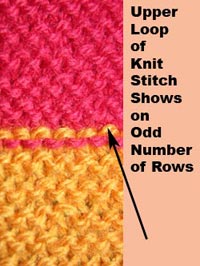
Figure 9
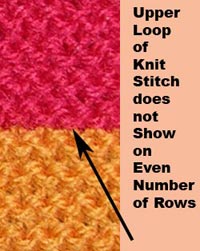
Figure 10
Left: Figure 9
The Doctor Who Season 12 Scarf consist of 7 different yarn colors and 53 stripes.
See Figure 9: Make Change colors after an even Number of knit rows. This is important because when odd rows face you the color change stitch row shows the upper loop of the knit Stitch.
If you change some stripes on even rows and other stripes on odd rows, the scarf would look like it had mistakes on it. All one side (odd rows) should look like figure 9, and all the other side should look like figure 10 (even rows) at the color change seam.
Right: Figure 10
Change colors after an even Number of knit rows. This is important because when even rows face you the color change stitch row does not show the upper loop of the knit Stitch. Therefore this is a more pleasing, invisible seam at the color change.
TIP: For this reason the colors should also change at the very FIRST stitch of the row when you are knitting GARTER STITCH STRIPES. Sometimes, in stockinet stitch where the pattern repeat is Knit 1 Row, Purl 1 row, repeat these two rows: the color is changed after knitting 3-4 stitches of the next row. This is to keep any knots or loose stitches off the edge of the scarf. But in Garter Stitch, since you are only knitting KNIT stitches, changing the stripe color after knitting 3-4 stitches of the first color would show the upper loop of the knit stitch on those 3-4 stitches, but not on the rest of the stitches. This would be unsightly!
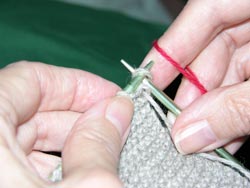
Figure 11
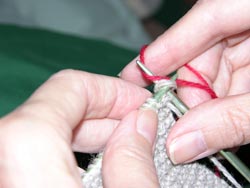
Figure 12
Left: Figure 11
Cut off the yarn color you had been knitting with, leaving about 6 inches to weave and hide the yarn ends when you finish the scarf.
loop the new color of yarn around your index finger.
Bringing your hands close together, insert the right hand needle into the front of the first stitch on the left needle from the left side.
Steady the right needle against the forefinger of the left hand.
Right: Figure 12
With your right hand, bring the yarn over the point of the right knitting needle. Notice that it goes under the needle, then your right hand index finger holds tension on the yarn.
This is like Figure 4, except using a new color
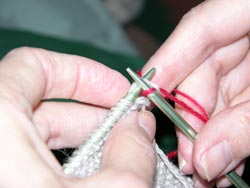
Figure 13
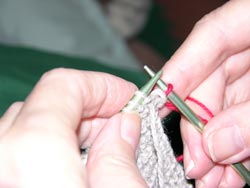
Figure 14
Left: Figure 13
Draw the yarn on the right hand needle through the stitch on the left hand knitting needle. This is like Figure 5, except using the new color.
Right: Figure 14
Slip the old stitch off the left knitting needle by pulling the right hand needle to the right.
This is like Figure 6 and 7.
Making sure the yarn is now positioned on the right hand as in figure 2, proceed to knit the stitches following figures 2-7 inclusively until all stitches have been knit unto the right hand needle.
This completes row one of the new color.
Finish Knitting the rows for this color stripe, and for rest of the scarf changing colors by following the chart directions for the measurements of each stripe. Hand knitters will find it easer to measure each stripe for the desired height in inches or centimeters instead of counting the garter rows. I recommend measuring in centimeters because this is more accurate. Even in the US, tape measures have inches on one side and centimeters on the other. There are 2.54 centimeters in 1 inch.
It is important that you knit a swatch first to make sure that you are using the correct needle size to obtain the stitch and row gauge to match the knitting instructions of your pattern. This knitting swatch is discussed in our article which goes through all the steps of our first knitting project "Learn to Knit by Hand or Machine “Doctor Who Season 12 Scarf Knit for Charity Challenge”.
Knitting Lesson One ~ the Season 12 Doctor Who Garter Stitch Scarf Replica
Hand Knitting Techniques used in Knitting Lesson One: Doctor Who Season 12 Knit Garter Stitch Striped Scarf consists of Several Parts, all with Photo Instructions for each step: Continue on with Your Basic Hand Knitting Techniques for Lesson One
- Basic Hand Knitting Techniques Part 1: how to make a slip knot to begin,
- Basic Hand Knitting Techniques Part 2: then cast on the required number of stitches
- Basic Hand Knitting Techniques Part 3: how to knit the knit stitch; garter stitch just consists of two knit rows
- Basic Hand Knitting Techniques Part 3: how to change colors in knitting for different colors of stripes when knitting garter stitch
- Basic Hand Knitting Techniques Part 4: how to bind off.
- Basic Hand Knitting Techniques Part 5: Finish Knitting: how to weave in the ends of yarn colors at the changing points
- Basic Hand Knitting Techniques Part 5: Finish Knitting: how to attach tassels
- Basic Hand Knitting Techniques Part 5: Finish Knitting: how to steam lightly and hand press
This is just one way to Cast On in Hand Knitting. We use this knitting technique in our first Lesson for Beginning Hand Knitters. It is used in our knitting instructions for the Doctor Who Season 12 Knit Garter Stitch Striped Scarf. Find the Pure Wool yarn Kit for this scarf in our online knitting catalog.
Click Here to Return to the Main Article : Learn To Knit by Hand or Machine ~ Doctor Who Season 12 Scarf Knit for Charity Challenge to follow the entire Little Knitter Experience of Researching and Developing a Knit Project!
Look for our Knit for Charity Challenge Doctor Who Season 12 Scarves ~ hand knit or hand loomed in Garter Stitch with Nature Spun pure Wool in The Knit Tree’s One of a Kind Showroom
If you do not find any available, contact customerservice for information and to get on our waiting list.
Visit us on facebook too ~ page is in development
