Article Including Free Knitting Instructions for Wool Knit Cap with Roll Hem and Cotton Facing
Schematics and Directions are Written for Knitting Machines, but this Pattern is easily Converted to Hand Knitting
This article was first seen in:
“Machine Knitters Source” Magazine
written by Sharon Nani
Issue: #98 (Sep/Oct 2000)
"Sporting Around with Ski Hats"
Steps in Designing and Knitting a Hat
Brief History of the Development of the Original ‘Hat Characteristics”
It is getting to that time of the year when my brain starts to think about all those projects I should be knitting in preparation for the holiday season. I have lots of family and friends who love the out of door winter sports. I also have production clients who need good ‘bread and butter’ items to sell. Therefore, for this ‘Sporting Around’ issue of MKS, I have chosen to deviate slightly from the totally technical aspects of my articles and give you a bonus of sharing one of my favorite styles of ski hats with you that I make as gifts. I have also developed variations for clients. Yes, of course it will also contain the mechanics of knitting this hat with speed and efficiency.
First, let me give you a brief history of the development of the original ‘hat characteristics”. One of my clients is the Native Americans on the Hoopa Reservation in Northern California. It is their goal to produce knit items to sell that would tie part of their history to a modern day art form. Their history shows that they wore baskets on their heads to protect them from the weather elements. This was the item of inspiration to develop a pattern for a ‘basket hat’ to be knit on the Passap knitting machine. It had to meet some simple criteria:
- Rounded at the top, like a basket
- Have jacquard motifs taken from their tribal baskets (they wanted a ‘single layer’ hat with no motif floats)
- Motifs must have sharp lines because the basket patterns for the Hoopa’s are very geometric
- Simple to make, so beginner Native American knitters could be trained on this pattern
- Quick and economical to Knit so that it could be marketed at a price relative to a ‘quantity’ bread and butter item
The rounded shape done quickly was the biggest consideration. It could not be done by knitting a rectangle and using the standard ‘cut an sew’ technique of serging the upper part of the hat with triangular darts to round the top. This method would not result in the smooth, rounded, basket effect. The only choice is to decrease the stitches at the top of the hat in a uniform manner. This would be a time consuming process if done by manual techniques. I will explain some options in this article for the different knitting machines to make this process more efficient.
Schematic of Basket Hat
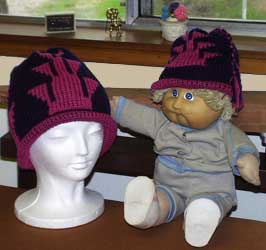
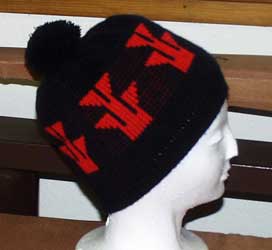
Diagram One to the Left, shows the schematic in inches of The Basket Hat. I also denoted the different shaping techniques by using the letters A-D. Figure One shows the finished hat.
Let us analyze the shaping techniques in Diagram One.
Part A: the hat started with a 2:2 rib. This rib was chosen because it is easy to ‘plug up the holes” which form when you go from a needle bed set up not using every needle in working position to jacquard knitting which uses every nd. Simply stop on the row before the final row of rib. Bring the required empty nds to working position, set the locks [carriages] to tubular [partial] knitting. K 2 R’s. Set both locks [carriages] back to knit. Knit the final row of part A to seal the holes.
Part B is knit in jacquard pattern of choice. It is at the end of part B that the first decrease of stitches is made. The objective is to decrease the number of sts by one half. This step is the same for any machine. Transfer the sts to the main bed for single bed knitting. Knit 1 row to eliminate the double sts on each nd. All knitting machines that have transfer carriages available to them would speed this process. All transfer carriages will transfer all the stitches from one bed (ribber bed) to the main bed when there are sts on both beds. Refer to your transfer carriage instructions for this procedure. Passap U100/U100E set to number 4. In addition, please note the following possible trouble spots.
How to Use a Transfer Carriage on a Knitting Machine
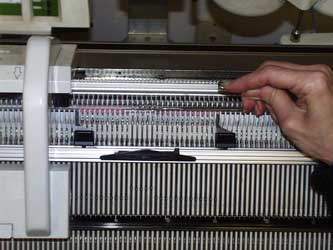
There are some rules that are very important to understand when using a transfer carriage. The main one is that the stitch size must be increased by usually one whole number on each lock (carriage) before knitting the row before transfer. This stitch size is variable according to the yarn you are using. On the passap you can tell if the stitch size is correct by taking the stitch bar out of the U100 and press it on the row of knitting to see if it pushes the yarn and the stitch bar far enough down below the hooks of the nds so that the nds do not jam into the bar when they go forward to transfer the stitches. See Figure Two to the left.
Japanese transfer carriages work on the same principle. I often have students tell me that their carriage does not work, it always jams. It ‘will jam’ , the nds run into the stitch bar of the transfer carriage, if you forgot to increase the stitch size enough. Another note: this stitch size should never be increased by more than 1 whole number at a time. Divide the increase of stitch sizes between 2 rows if this becomes necessary. For example, often times natural fibers: cotton, wool, or rayon, require that an increase of one and one half is needed to achieve the correct elasticity. Your transfer carriage will also not work smoothly if you have not ‘oiled it’! And it will drop all the stitches if you forgot to put the needle bed in ‘transport position’. Transport position is ‘racking handle at 9 o’clock , very important moving the racking handle in a counter clockwise motion , for the passap. ( P/H lever to H for Japanese machines.) The needles on each bed must be close enough so that the stitches can move from one bed to the other, but not so close so the heads of the nds crash into each other! The elasticity of the yarn can also affect this transport position. Minor adjustments may be needed.
Part C: Is done different for the Passap versus Japanese Machines. The objective again is to reduce the bulk of the knitting without making the fabrication too thin or different. The transfer carriage of the passap U100 or U100E will transfer from stockinet to 1:1 rib by setting it to the number 2 before transfer. Refer to manual for detailed instructions. This is what the Basket Hat: Diagram 1 calls for. The transfer carriages of Japanese machines do no have this feature. So I would suggest that if speed is desired, alternative choices are:
- Add a strand of yarn to compensate from converting from double bed to single bed
- Use your garter bar to transfer every other adjacent nd to the next nd, therefore decreasing by one half
- Or Use your lace carriage for one row with a pattern punched, drawn, or programmed to transfer every other nd to the adjacent nd
Part D: Decrease by one half again
Notice that the needle bed set up on Diagram One: Part D shows you that it is stockinet (one bed) on EON (every other needle). Japanese machines already did this as part C. Therefore, if less bulk is desired use the techniques in part C to decrease to every 3rd needle, or simply knit an additional one half inch in part C then gather off the remaining sts.
Passap Machine knitters will transfer the sts from the front bed “to the same nds that already have a st in the hook, not the empty nds. You cannot do this by turning the racking handle one and one fourth turn counter clockwise in one wallop. This action would put too much strain on the nds, and the stitch bar of the transfer carriage could never push the yarn and bar below the hooks of the nds. Remember, you must always create enough elasticity between the two knitting machine beds. Therefore follow this procedure. Two rows before the end of section C, (the lock is on the right) turn the racking handle counterclockwise to the ‘down’ or 6 o’clock position. Increase the stitch size by one half of a whole number (2 clicks). K 1 R. Increase the stitch size by a whole number. K 1 R. Turn the racking handle, counter clockwise to 9 o’clock position. Now, transfer the stitches with the transfer carriage to the same nds that already have sts on them and proceed with the number of rows requested in part D. Finish by gathering off the remaining sts and pulling up into a tight circle. Increase the stitch size by one half of a whole number (2 clicks). K 1 R. Increase the stitch size by a whole number. K 1 R. Turn the racking handle, counter clockwise to 9 o’clock position. Now, transfer the stitches with the transfer carriage to the same nds that already have sts on them and proceed with the number of rows requested in part D. Finish by gathering off the remaining sts and pulling up into a tight circle.
Bulky Knit Wool Ski Hat with Cotton Facing
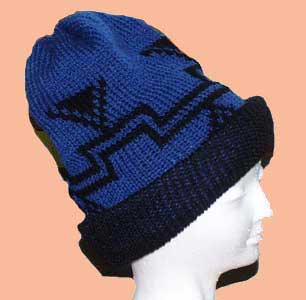
Knitting machines that do not have a ribber can still make a nifty hat that follows the above ‘rounding’ of the upper cap procedures. See Diagram Two and Figures Three and Four for the finished hats. This was a bulky ski hat I developed for my son, Ken. He said “Mom, can you write up a hat pattern for me to knit? I want to sell them at the local ski shop for all my snow boarding buddies. It has to be wool, but not itchy on the head, and the funkier, the better!” Note that Diagram Two calls for a facing knit with Silk Cities softball cotton, then the outer hat is BaaBaJoes Wool Company: Wool Pak Yarns NZ, 8 ply. The facing is hung by the ‘bar hem method’ for speed. See my articles in MKS Issues 88 and 89 for a refresher on this procedure. Finally, rounding off the top finishes it. Note the difference between the hats in The figure at the beginning of the article and the picture below which are simply a different number of inches in the facing and outer portion to create the height of choice.
You can see lots of variations of Native American Basketry Caps that we have knit using most of these same knitting techniques in our online shopping catalog.
Use your own creativity to put different kinds of designs on these knit caps or beanies in a variety of different cap knitting shapes.
In summary, think about the techniques applied in these two styles of hats. These techniques can be applied to different types of projects. How many different projects can you think of where you can utilize these skills?
Visit us on facebook too ~ page is in development
