Hand Knit Finishing Techniques
Weave in Loose Yarn Ends ~ Hang Yarn Tassels ~ Steam Wool
Hand Knitting Instructions by Sharon Nani / The Knit Tree
Photos by David Nani
Hand Knitting begins by making a Slip Knot and Casting On the required number of stitches for your project. Then you follow the instructions for knitting the body of the project which in this case is knitting the knit stitch for a Garter Stitch Scarf. The final part is Binding Off the hand knitted project and doing the finishing techniques required. This is part five of the Basic Hand Knitting Techniques Series which takes you through Photo Steps Instructions of how to do the hand knitting finishing techniques involved in our First Hand Knit Beginners Lesson. This involves, weaving in the loose yarn ends where all the striped color changes were made, hanging the colorful tassels which consist of all seven colors, and polishing the finished wool Doctor Who Scarf by steaming and hand pressing.
NOTE:Click on all images to see an enlargement of the photo!Photo Steps Instructions of how to do the Hand Knitting Finishing Techniques
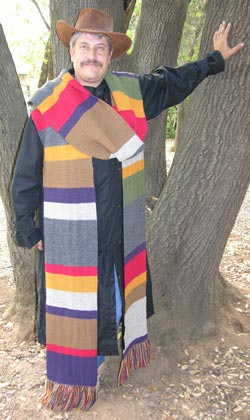
Fun and colorful Doctor Who Season 12 Striped Garter Stitch Scarf
Our First Hand Knitting Project for our Little Knitters Program is the Fun and colorful Doctor Who Season 12 Striped Garter Stitch Scarf. We also offer Pure Wool Yarn Kits for this scarf which can be knit as the original Dr Who Scarf which is 15 feet long, or you can knit 2 scarves 7.5 feet long, or knit three great gifts of gentlemen scarves each 5 feet long, from this yarn kit.
Read about the entire learning process of the Little Knitters, taking them through researching to find and buy the correct yarn and colors for this Fan Based Knitting Project, drafting the knit pattern, learning the knitting techniques, then knitting this scarf for their Knitting for Charity Challenge. Click here to read Doctor Who Season 12 Scarf Knit for Charity ChallengeYou may even find a finished Doctor Who Scarf available for purchase with proceeds donated to The Leukemia & Lymphoma Society and The Little Knitters Program.
We share these knitting instructions with you so you can also learn to knit with a fun and colorful knit project. Enjoy knitting with your own yarns or you can purchase the pure wool yarn kit with Spreadsheet Knitting Chart from our online Catalog for the Season 12 Dr Who Scarf. Print out the series of instructional articles from our web site to aid in your learning to knit process
How to Weave in and Hide the loose Yarn Ends in Hand Knitting
Start with a Square or Surgeon’s Knot: Step One
Every knitting project has loose ends of yarn that should be carefully hidden within the knitting so that it is as invisible as possible and so that it does not work its way loose and cause your knitting project to unravel or come apart.
A very simple and secure method of weaving the yarn ends following the formation of the knit stitch is the best way that I have found to accomplish these purposes.
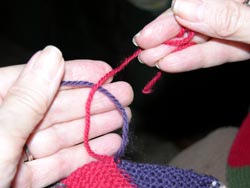 Figure 1
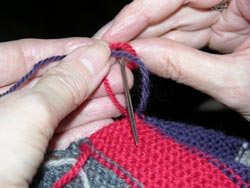
Figure 2
Left: Figure 1
Start with a Square knot or a Surgeon’s Knot. As the name applies the Surgeon’s Knot is a knot that will not allow the yarn to slip out of the yarn. This knot is particularly useful with slippery yarn such as rayon
Taking the two ends of yarn, cross the left end over the right end.
Right: Figure 2
Pinch the top of the two yarn ends to hold them in the position that creates a circle. Taking the left end behind the right end yarn, Tuck the left end yarn through the circle bringing it to the front.
For photography purposes I threaded the left yarn end in a darning needle so you could follow the directions better.
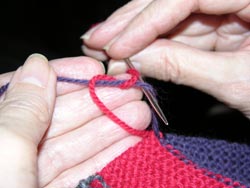
Figure 3
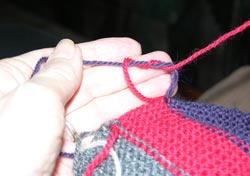
Figure 4
Left: Figure 3
For the Surgeon's knot: Taking the left yarn end to the back of the circle, Insert it into the circle and pull it to the front. Now the left yarn has been wound around the right end yarn two times
Right: Figure 4
Shows how the yarn is twisted before pulling the yarn ends are pulled in the opposite directions to snug the knot.
Figures 1 thru 4 show One half of the Surgeons knot, because wool yarn is not slippery, and because I did not want a bulge of a yarn knot on the edge of my scarf – I did not do the 2nd half of the knot.
For learning purposed for other projects. The Full Surgeons Knot does Figures 1 thru 4, but putting the now right end yarn over the left end yarn and tucking it through the circle one time, not two times In our example pictures, it would always be the red yarn which is put to the front of the purple yarn and is the yarn always doing the tucking through the circle:
In summary for the knots think: Square Knot: left over right and tuck, tighten up, right over left and tuck, tighten up. The Surgeon’s Knot: left over right and tuck and tuck, tighten up. Right over left and tuck. Tighten Up. Dependant upon the placement, thickness, and how slippery a yarn is, your choice of knot would vary. Sometimes NO KNOT is used, if the following weaving process would hold the yarn in place.
How to Weave in the Loose Ends of Yarn: Step Two
All Hiding of yarn ends should be done on the back side of the knitting project, in the case of garter stitch pattern both sides are the same except at the visual seam of the place where colors are changed. The back side would show the interloping of the two colors as shown in Figure 5.
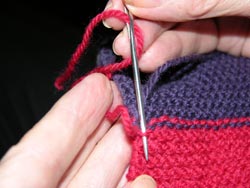
Figure 5
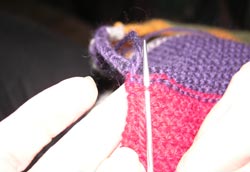
Figure 6
Left: Figure 5
Thread the yarn end in a darning needle, following the line of the knit stitch, poke the needle down through what looks like the bottom of a U, the sinker loop. Pull the yarn through gently, so as to keep the hidden yarn the same size as the actual knit stitch.
Right: Figure 6
Following the line of the knit stitch, poke the darning needle up through what looks like an up side down U, the upper loop. Pull the yarn through gently, so as to keep the hidden yarn the same size as the actual knit stitch.
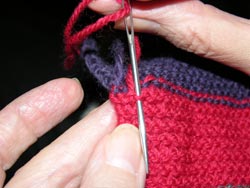
Figure 7
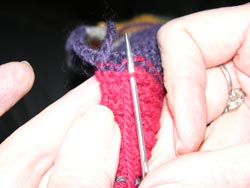
Figure 8
Left: Figure 7
Repeat Figure 5: Weave Down
Right: Figure 8
Repeat Figure 6: Weave Up
Note: with slippery yarn such as rayon this weaving up and down would be done for more times, but this wool secures well so it is not necessary for this yarn.
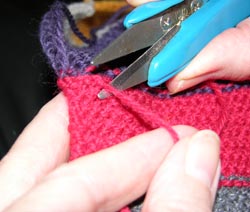
Figure 9
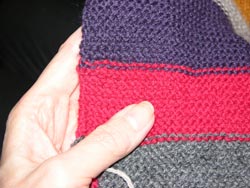
Figure 10.
Left: Figure 9
Snip off the Hidden Yarn end close to the knitting, so as not to leave any end yarn protruding for this Category
Right: Figure 10
The Red and Purple yarn ends have both been hidden and snipped off. This weaving should always be done in a manner to make it as invisible as possible.
Summary: It is your choice dependant upon the yarn and stitch structure of your knit project to start with No knot, square knot, surgeon’s knot, or half surgeon’s knot. I used half surgeon’s knot in our example Doctor Who Scarf. Then weave the yarn ends in enough times to secure the yarn end and finally Snip off the yarn end close to the knitting.
How to Make a Yarn Tassel
The Doctor Who Season 12 Garter Stitch Striped Scarf instructions are to finish the scarf by attaching 5 inch long tassels composed of 1 strand of each of the Seven Colors close together on each end of the scarf. My scarf has 22 tassels on each side.
Cut the strands for each tassel at 12 inches. There are 7 colors 1 strand of each color, 12 inches long is needed for each Tassel. There are a total of 44 tassels. After the yarn is cut, attach the yarn as a tassel to the scarf ends. The following photos show the steps.
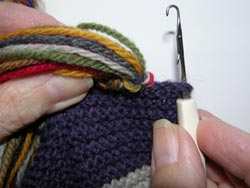
Figure 11
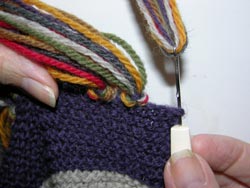
Figure 12
Left: Figure 11
Using a large Latch Tool or Crochet Hook, poke the tool through the scarf edge at a 1 row depth, where you wish to place the tassel.
Right: Figure 12
Fold Seven 12” long strands of yarn in half. Hook the middle of the 7 strands of yarn with your latch tool or crochet hook.
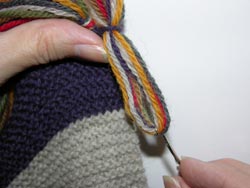
Figure 13
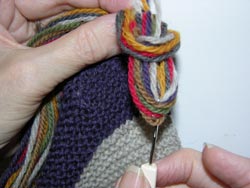
Figure 14
Left Figure 13
Pull the strand of yarn through the Scarf Edge far enough to create a circular loop.
Right Figure 14:
Insert your tool back through the center of the circular loop created in Figure 13 and grab all the yarn ends (14 since the seven strands were folded in half). Pull these strand of yarn ends through the circular loop.
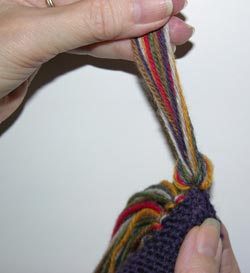
Figure 15
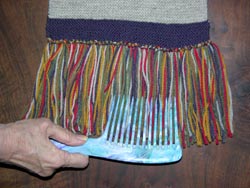
Figure 16
Left: Figure 15
Making sure that the 7 yarn ends are the same length, grab the end of the strands and pull away from the scarf edge to snug the tassel knot.
Tassels can be placed as desired on the knit project.
The Doctor Who Scarf is a Replica of the original Doctor Who Scarf worn by Tom Baker in his Science Fiction British TV Series; Dr Who. This scarf called to have tassels placed close together.
Right: Figure 16
If you have a large tooth comb, comb the fringe strands to even them all out and trim to approximately 5 inches or desired length.
Note: you always cut the strands longer then twice the desired finished length to compensate for the fringe attaching knot and trimming unevenness.
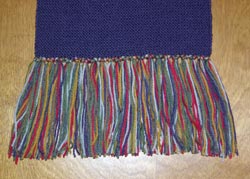
Finished tassel
Polish Your Knit Project with Steam and Hand Pressing
Garter Stitch is a very Stable knit structure. This means it lays straight and doesn’t have a lot of stretch to misshape it. In addition Sport weight Wool rarely needs much steam. My rule is ‘knit it to size’, and just use steam to polish or give a nice finish to the project. Passing steam over the knitting sets the stitches and often times gives a softer feel to the yarn.
I steam all my knits to give a final polish to the project. There are several methods of steaming or blocking dependant upon the yarn, knit structure, and how much drape you want in the finished item. I have written several articles on Steaming Techniques which I will put up on The Knit Tree’s web site as time allows. So for this article, I am referring to steaming our sample lesson project: The Doctor Who Scarf hand knit with high quality pure wool sport weight yarn.
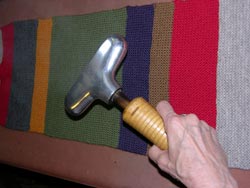
Figure 18
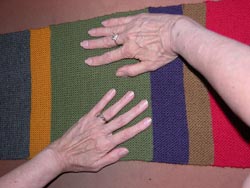
Figure 19
Left: Figure 18
I use a garment steamer, but you can use any steam iron that gives our good steam.
Use a padded area big enough so that your scarf does not drape over the edges as you steam.
An ironing board would work in this case. For bigger projects I made a 4’ x 4’ blocking board before I had my professional steaming vacumn table.
Pass steam over the knit scarf 2 to 3 inches above the knitting – do not press. You just want the steam to warm the knit.
Right: Figure 19
With your hands lightly hand press or spread outward to the side edges if any edges need to be brought out slightly to match the surrounding color stripes.
The wool cools quickly, then you can move to the next section and repeat steps in Figures 19 through 20 until entire scarf is steamed and hand pressed.
Paragraph clearing both images placing it below the images.
Knitting Lesson One ~ the Season 12 Doctor Who Garter Stitch Scarf Replica
Hand Knitting Techniques used in Knitting Lesson One: Doctor Who Season 12 Knit Garter Stitch Striped Scarf consists of Several Parts, all with Photo Instructions for each step: Continue on with Your Basic Hand Knitting Techniques for Lesson One
- Basic Hand Knitting Techniques Part 1: how to make a slip knot to begin,
- Basic Hand Knitting Techniques Part 2: then cast on the required number of stitches
- Basic Hand Knitting Techniques Part 3: how to knit the knit stitch; garter stitch just consists of two knit rows
- Basic Hand Knitting Techniques Part 3: how to change colors in knitting for different colors of stripes when knitting garter stitch
- Basic Hand Knitting Techniques Part 4: how to bind off.
- Basic Hand Knitting Techniques Part 5: Finish Knitting: how to weave in the ends of yarn colors at the changing points
- Basic Hand Knitting Techniques Part 5: Finish Knitting: how to attach tassels
- Basic Hand Knitting Techniques Part 5: Finish Knitting: how to steam lightly and hand press
This is just one way to Cast On in Hand Knitting. We use this knitting technique in our first Lesson for Beginning Hand Knitters. It is used in our knitting instructions for the Doctor Who Season 12 Knit Garter Stitch Striped Scarf. Find the Pure Wool yarn Kit for this scarf in our online knitting catalog.
Click Here to Return to the Main Article : Learn To Knit by Hand or Machine ~ Doctor Who Season 12 Scarf Knit for Charity Challenge to follow the entire Little Knitter Experience of Researching and Developing a Knit Project!
Look for our Knit for Charity Challenge Doctor Who Season 12 Scarves ~ hand knit or hand loomed in Garter Stitch with Nature Spun pure Wool in The Knit Tree’s One of a Kind Showroom
If you do not find any available, contact customerservice for information and to get on our waiting list.
Visit us on facebook too ~ page is in development
